

Unable to feed and clogged nozzle
HOME> Support Services> ATOM 2 Series> Hardware Support> Unable to feed material and clogged nozzle
Feeding points
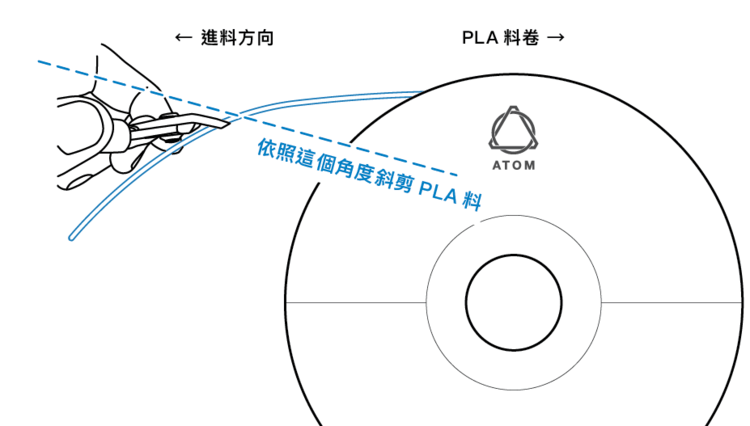
Figure 1: The trimming angle of the material roll
1. New Paragraph uses diagonal pliers to cut an oblique angle. Please make sure that the oblique angle is as shown in the figure (note the direction of the material roll). Make sure that the sharp corner is outside the arc. (figure 1)
2. Turn on the power of the printer, preheat the print head first, click the knob on the side of the screen [Prepare]> [Preheat 200 deg].
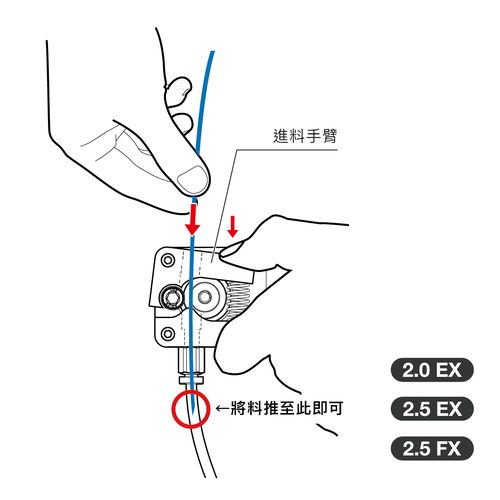
3. Please press the feeding arm of the extruder according to Figure 2, and feed the material to the position of the red circle.
4. After the nozzle is heated to 200 degrees, click [Prepare]> [Load Filament] on the screen for automatic feeding.
picture 2-1
Photo By: John Doe
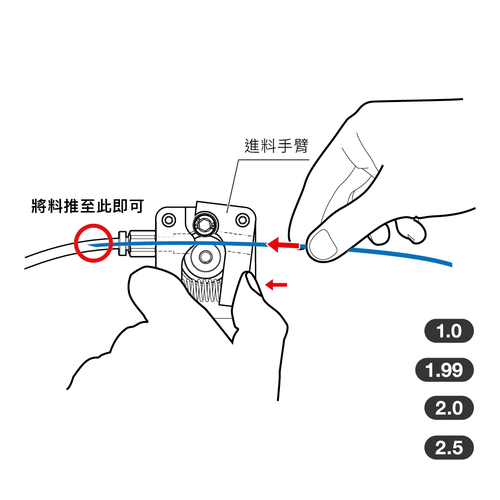
Figure 2-2
Photo By: John Doe
Button
Check the extrusion motor
Note! Do not touch the heated nozzle without any protective measures!
1. Heat the nozzle to 200°C. To
2. When confirming that the nozzle is heated to the set temperature, press and hold the feeding arm, and push the PLA material into the feeding mechanism (for this step, please refer to Figure 2 of "Feeding Points").
3. If the material is smoothly extruded from the nozzle, it means that the mechanism at the nozzle end is normal.
4. Release the feed arm and restart printing.
5. After reprinting, if the material is not smoothly extruded from the nozzle, it means that there may be a problem with the extrusion mechanism. Please recheck whether the extrusion mechanism is locked. Be sure to confirm that the center point of the bearing, PLA material and the groove of the extruder wheel are on the same line (Figure 3), and confirm that the extruder wheel is locked to the shaft center of the motor with a headless screw.
6. Check if the surface of PLA wire is intact.
7. Check whether the squeezing wheel and the feeding arm are tightly sandwiched between the materials.
8. Check whether there are any residual plastic particles on the surface of the extrusion wheel. You can clean the extrusion wheel with a small brush or toothbrush.
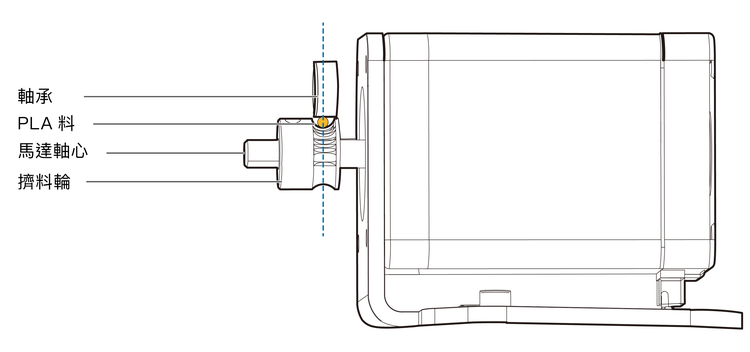
Figure 3: Make the center of the bearing, PLA material and extrusion wheel in line
Check the nozzle mechanism (applicable to Atom 2.0/2.5 series)
*note! Do not touch the heated nozzle without any protective measures!
1. If you cannot eject material from the nozzle by pushing it by hand when checking the extrusion mechanism, it may be that the nozzle is blocked. Please heat the nozzle to 200 degrees and then perform the following inspections. To
2. The first step is to confirm that the heat sink is in contact with the heat storage block of the nozzle, and that the heat storage block underneath is locked with the nozzle end. This step is to confirm that the ceramic heating plate of the nozzle does contact the nozzle for heating. To
3. After confirming that the above steps are correct, the following conditions may cause the print head to be clogged (be sure to eliminate the following possibilities one by one before you can continue printing):
Condition 1-1-PLA material cannot enter the nozzle
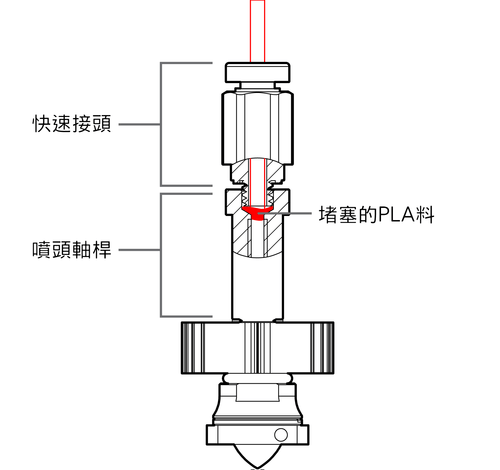
The PLA material is stuck at the connection between the quick connector and the nozzle. If this happens, it is recommended to pull the material out, press the feeding arm and then pull the material out, trim the PLA material again, and confirm that the feeding end is sharp, which will make it easier to feed. , The situation can be ruled out.
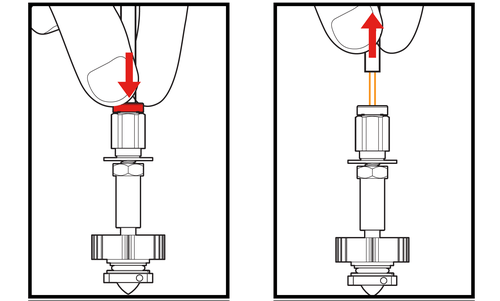
Figure 1: The trimming angle of the material roll Figure 2: Pull out the Teflon tube
Condition 1-2-If the PLA material cannot be extruded from the nozzle smoothly, you can pull out the Teflon tube from the nozzle
1. Confirm that the nozzle is at a temperature of 200 degrees, press the upper part of the quick connector (red part in Figure 1) to loosen the Teflon tube, and pull out the Teflon tube (Figure 2). To
2. Pull the PLA material from the nozzle first by pushing and then pulling it. To
3. Cut the PLA material at an oblique angle and push it into the nozzle again until the PLA material is about 5cm out of the nozzle. To
4. Then plug the Teflon tube into the quick connector. To

Figure 3: PLA thermal expansion stuck in the tube Figure 4: Teflon tube deformed due to overheating
Condition 2-The nozzle fan is not working properly
If the fan of the nozzle does not operate normally or is installed in the wrong direction, it will cause insufficient heat dissipation and overheating. The PLA material will not melt until the end of the nozzle. The upper part is connected to the quick connector section), the PLA material will expand when heated, and it will be stuffed into the Teflon tube of the nozzle shaft. (image 3)
Condition 3-The Teflon tube in the nozzle is overheated
If the temperature setting of the nozzle exceeds 250 degrees, the Teflon tube in the nozzle may be overheated and deformed, causing the PLA material to be stuck at the Teflon end and unable to discharge (Figure 4). It is recommended to set the temperature not to exceed 250 degrees. Because of the deformation, the plug is very serious, and the Teflon tube in the nozzle may need to be replaced (see the table at the bottom of this page for the length).
remind:
For the assembly steps of the print head, please click here to download the assembly instructions in the download area.
Condition 4. Excessive withdrawal
Because of the excessive [Suck] and [De-String] in the slicing software, the expanded part of the PLA material is drawn back too much, because the PLA material will expand when heated, and drawing back too much heated material may cause the expanded material to be directly drawn. It is stuck in the gap between the quick connector and the nozzle shaft, causing material jam. Please follow the steps below to eliminate jams:
*note! Do not touch the heated nozzle without any protective measures!
1. After allowing the nozzle to cool down, turn off the power of the 3D printer.
2. Press down on the black Teflon part of the quick connector so that the Teflon tube can be pulled out 3. Out of the quick nozzle.4. Cut the exposed PLA material.5. Loosen the quick nozzle from the nozzle mechanism.
6. Heat with a lighter to remove the PLA material jammed due to expansion. Pay attention to spray 7. There is also a section of Teflon tube in the head shaft, be careful not to injure it or remove it.
8. Reinstall the quick connector and nozzle on the mobile platform cover.
9. Reinsert the Teflon tube into the quick connector.
*Reminder: For the nozzle assembly steps, please click here to download the assembly instructions in the download area.
Condition 5.-Nozzle blocked
If it is not for the above two reasons, the nozzle (outlet end of the nozzle) may be blocked. For 0.4mm nozzles, you need to prepare a 0.3mm drill bit (or other metal rods with a diameter of less than 0.4mm). For a 0.2mm nozzle, it is smaller than a 0.2mm drill bit. Insert the drill bit from the nozzle outlet end into the nozzle to remove the blockage or excess material.
*Note that the direction of insertion must be parallel to the nozzle to avoid damaging the nozzle and reaming. To

The cleaning steps of the nozzle structure are as follows:
*note! Do not touch the heated nozzle without any protective measures!
1. Please disassemble the print head first as shown in GIF, remember to tidy up the wires to avoid breaking the wire set.
2. When the nozzle is preheated to 200 degrees, clamp it with a tool.
3. Unplug the old PTFE tube.
4. Use the smallest hexagon wrench in the tool set to insert into the nozzle and dig clean.
(If it is still not smooth, you can use a small piece of PLA to squeeze into the nozzle and dig it out, so that it can stick out more tenacious dirt.)
5. Extract the length of the PTFE tube corresponding to the machine. (Please refer to the table at the bottom of this page for length)
6. Put back all the parts in order, and arrange the wires to avoid pressing on the wire group.
Check Y deflector (EX series machine)

Note! Do not touch the heated nozzle without any protective measures!
If the EX series machine encounters poor refueling
1. Pre-lock the four screws on the Y deflector.
2. Heat the nozzle to 200 degrees.
3. After installing the PTFE tube on the Y deflector, put it on the nozzle connecting ring.
4. Grasp the PTFE tube with your hands and push it down.
5. Hold the Y deflector tightly, and tighten the four screws evenly.
6. Test the PTFE tube on the Y deflector, pull it by hand to see if it will come off, and then go to the next step, if it does, then tighten the screw slightly.
7. For the GIF on the left to test the smoothness of PLA, both sides need to be tested. If it is not smooth, relax the tighter side slightly, and then go back to step 6 to confirm. 8. Lock the Y deflector to the nozzle connecting ring.
Length of nozzle Teflon pipe (throat pipe)
Atom 2.5 FX
MX1-0.4mm nozzle
29.3mm
Atom 2.5 EX
Atom 2.5
MX3-0.4mm nozzle head
35.5mm
29.3mm
MK3-0.2mm nozzle
40.5mm
34.3mm
Atom 2.0
MK2-0.4mm nozzle
Please watch the video below at 2:20 seconds (please turn on subtitles).
Can't solve the problem?