

Slicing technical support
HOME> Support Service> Technical Support> Slicing Software
Preface
This page will explain several model examples. If you have not downloaded the officially recommended slice settings before proceeding, please download the slice configuration file in the download area.
The article first focuses on the way the model is placed to avoid printing in the air. Since everyone will be exposed to this aspect soon, everyone should be familiar with this chapter. Next, we will analyze the deformation that is easily caused when printing small objects and explain the adjustment method. This chapter will be a little more advanced. It is recommended that everyone learn the basics and make sure that the machine has been checked and assembled again and again before proceeding. chapter. In the third subsection, we sorted out some images and combined different situations into a hand model, so that everyone can practice making more accurate slice software adjustments through this example.
Finally, attach the model print size adjustment method, so that everyone can adjust the machine to a more accurate state.
(You still have to go through the overall organization inspection first before coming to this chapter!)
How to correctly place the printout
The following files can download the Atom print test file from the download area, and select the cart.stl file for setting exercises.
The following elements are the main key to the success and perfect printing of 3D printing:
1. When assembling, you must follow the assembly instructions step by step to assemble.
2. The model to be used for printing must be checked to avoid dangling, large angle or extremely thin features, and also to confirm whether the model itself is broken or incomplete.
3. Rotate the object to a suitable printing angle. Although Atom can print a large angle or a certain range of hanging without support, rotating the object to a suitable angle to reduce the hanging part can greatly increase the number of columns. Probability of success in printing. Opening the support printing in the slicing software is also a way to increase the success rate, but this will increase the printing time, it will also increase the time to remove the support, and it will also increase the consumption of PLA material. In addition, the surface of the removed support will easily appear rough Therefore, I suggest you follow the method we taught, find a proper angle to print, and minimize the use of support printing.
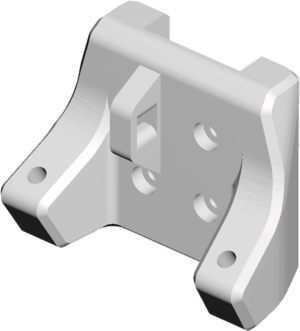
4. Adjust the appropriate KISSlicer software (or other slicing software) parameters to make printing smoother. The model on the left is a good example. We can learn how to find the appropriate angle for printing by using the following pictures.
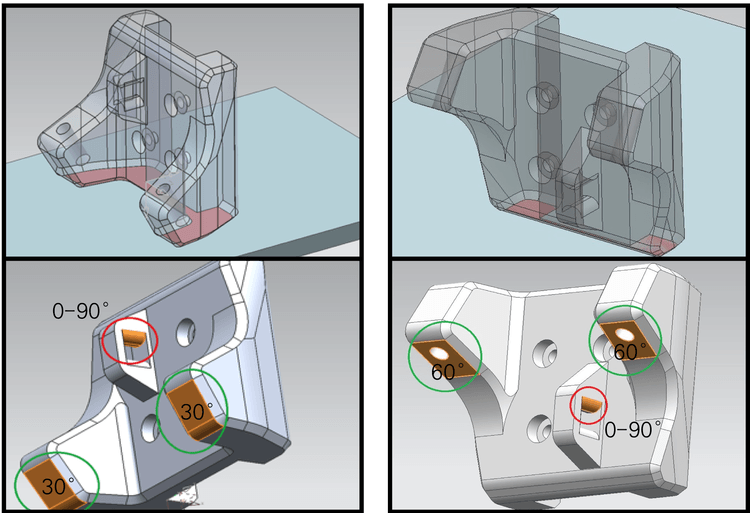
Picture 1 (left): the best angle for printing / Picture 2 (right): the angle not so suitable for printing
Figure 1 is the best printing angle for the following reasons:
● Comparing Figure 1 and Figure 2, we can find that Figure 1 provides more printing planes in contact with the printing platform, which will provide a more stable printing foundation than Figure 2.
● The printing angle of Figure 1 is relatively small, the angle between the Z axis is about 30 degrees, and the angle between Figure 2 and the Z axis is about 60 degrees. Generally, when Atom has the fan blowing on the side of the nozzle, it is recommended that when the angle between the feature and the Z axis exceeds 60 degrees, the support option is turned on to avoid direct printing.
●Picture 1 will be more stable when the center of gravity of the printed item is lower, so if it is printed at 90 degrees, it will be more stable; on the other hand, because the center of gravity is high, it may be shifted or tilted for various reasons. .
If you use other angles to print, no matter which side, the curved surface is more than the upper or lower surface, you need to open the support to print, which is less recommended by us, we recommend to find the most plane contact with the printing platform as much as possible , Will provide a relatively stable printing foundation. Although the Atom can be printed to 80 degrees in the air during test printing, comparing Figure 1 and Figure 2, the angle of 30 degrees is still easier to print than 60 degrees, so it is still better. It is possible to select an angle with a lot of bottom contact, a smaller angle with Z, and a low center of gravity for printing.
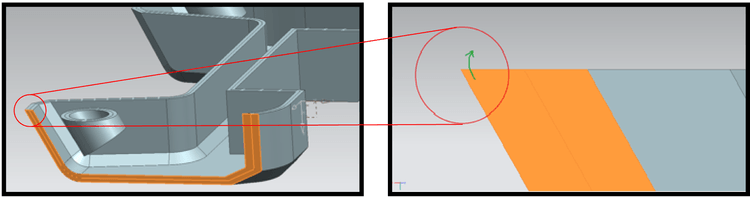
Figure 3 (Left): Sectional view of Cart.stl / Figure 4 (Right): The sharp corners of the front end may warp due to overheating.
If the sharp corners as shown in Figure 4 are printed without the support, it may be slightly warped and deformed because the material just extruded has not been cooled and because there is no support underneath it can be pulled, we can use the loop in the KISSlicer Increase the number of turns to improve the stacking of thin objects, and increase the number of turns to 3 to 4 turns to assist in forming and fixing. Or set the side blowing fan speed of [Fan / Cool] so that the newly extruded material can be cooled and hardened at a faster speed, so that the details of the model will be more obvious.
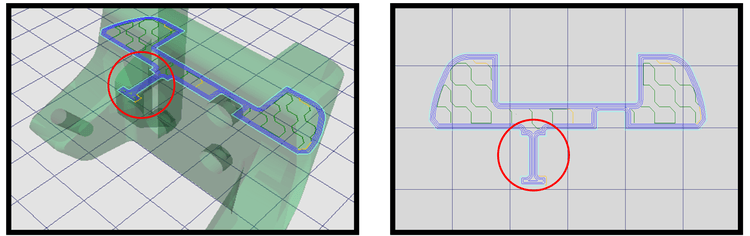
Picture 5 (Left): The first floor at the bridge/ Picture 6 (Right): The first floor at the bridge from the top view
Figure 5 shows the first layer of the bridge. Usually, the part of the bridge needs to be supported, but because this part of the bridge is about 6mm, the distance is short and the nozzle side blowing fan accelerates the cooling and hardening, so the Atom can be easily arranged. Print without support. The printing path at the bridge is shown in Figure 6.
Reminder: Before printing, we should preheat to remove the remaining material sticking to the nozzle (use paper towels or compressed sponge for soldering, do not use nylon or foamed materials), to avoid printing such steep slope structure comparison The thin area will be warped and deformed due to sticking.
Slice analysis integration
Take the palm model as an example and see if you can think of the elements to consider when slicing?
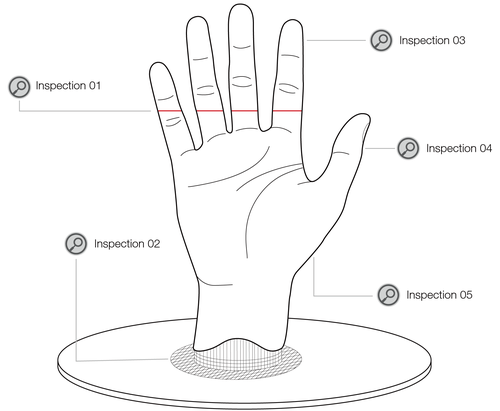
Inspection 01:
Prints with gaps
Enable [Wipe] and [De-String] two options to prevent wire pulling. Also make sure that [Trigger] and [Min Jump] are set to a lower value
Inspection 02:
Models with uneven bottom surface (not touching the printing platform):
You can see that the bottom surface is uneven and has no contact with the printing platform, so you must first turn on the [Support] function, set it in the state of [Support: Rough], and turn on the [Support Z-Roof] bottom plate and support function to allow it There is a stable foundation, please note that when setting this height, make sure that this height supports the object. Since the support usually grows into a thin sheet, it is necessary to turn on the [Grid] of [Raft Type] to grow a layer under the object so that the object can fit the printing platform more closely.
Inspection 03:
Set a reasonable cooling time and turn on the side blowing fan to assist cooling.
Inspection 04:
The whole hand can be printed with inner filling [Infill] or hollow [Hollow]. In addition, it is recommended to check
[Loops go from Inside to Perimeter] Make sure to print from the inside to the outside when printing the outer circle, so that the model is less lumpy.
Inspection 05:
Features with a large angle:
Turn on the side blowing fan to cool down faster.
Can't solve the problem?