

Common Problem
HOME> Support Service> Technical Support> FAQ
Print out inspection
The discharge of the nozzle cannot stick to the bottom plate
● The distance between the nozzle and the mobile platform is too high, which causes the first layer of printing to be too high to stick to the bottom plate. Please change the height of the slice setting. To
● The adhesion of the bottom plate is too low. It is recommended to use lipstick glue, masking tape or spray glue to increase the adhesion of the bottom plate. To
● The temperature of the nozzle is too low, causing the material to not be able to smoothly adhere to the glass surface, because the material has cooled before it adheres to the glass surface. This phenomenon is usually accompanied by irregular discharge. It is recommended to increase the temperature to solve this problem. To
● There is residual material on the nozzle, which sticks the newly discharged material or causes plane correction errors. It is recommended to check whether there is any residual material on the print head before printing, and be sure to keep the print head clean. To
● The nozzle is moving too fast, and the newly discharged material is pulled away by the nozzle. It is recommended to use the knob to slow down when laying the first layer, and wait for the printing to stabilize before speeding up the printing.
When the nozzle is in the first layer, it scrapes to the bottom plate without discharging
Situation 1-No output at all
It means that there is not enough Z-offset to allow space between the print head and the printing platform to discharge the material. Please refer to the automatic calibration setting tutorial.
Condition 2-The discharge of the first layer is uneven and the bottom plate is still scratched
Indicates that the Z-offset still needs to be increased. Please refer to the automatic calibration setting tutorial.
Print size difference

(Left: Original 3D model size/Right: Printed product with different length and width)
If the printed length and width dimensions are not the same, it means that the assembly is not accurate enough. It is recommended to check all the assembly structures to ensure that there is no gap between the aluminum extrusion and the triangular connection, and confirm that the ball head is locked to the end and the sliding table is locked. On the slider, the belt tightness is the same, and the slide rail is centered on 2040 aluminum extrusion (overall mechanism inspection).

(Left: Original 3D model size/Right: Scaled and printed finished product)
If the measured length and width are proportionally reduced or enlarged compared with the actual object, it can be corrected through the firmware setting.
You can download the Atom print test file from the download area, and select the 50x50 Vase.stl file to adjust the print size. Print 50x50 Vase.stl with the internal filling as [Vase], or use the 50x50 Vase.gcode in the print test file to print directly.
Use vernier calipers to measure the length and width of the printed items
1. Compare the length and width of the printed item with the 3D model.
2. The length and width of the printed item should be the same.
Resize
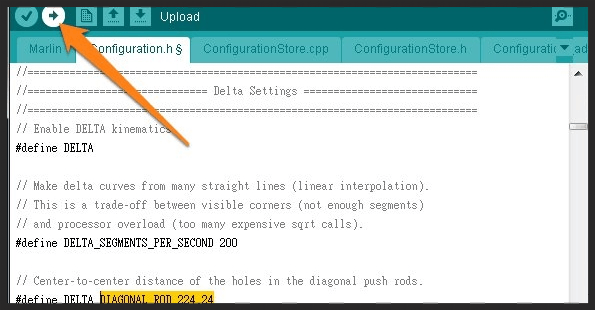
1. Use the Arduino software to open the [Marlin.ino] file. To
2. Click [configuration.h]. To
3. Search for [DELTA_DIAGONAL_ROD]. To
4. Use the following equation to update the value of [DELTA_DIAGONAL_ROD].
New value = old value x (printed size / 3D model size)
For example: New value = 224.24 x (48 / 50) = 215.2704
5. Save the file and upload the firmware to Atom's circuit board via USB.
The output is not smooth when printing

● The extrusion mechanism operates abnormally. Please check that all screws of the extrusion mechanism are fixed and the feeding path should be kept clean. Confirm that the extrusion wheel is firmly locked. In addition, make sure that the extrusion spring is installed in the correct position to ensure that the bearing on the extrusion arm and the extrusion wheel operate correctly, and the material can be discharged smoothly.
● The extruder motor is not powerful enough. Please check whether the DRV8825 chip of the extrusion motor is adjusted to the correct voltage value of 0.4V, or whether it is damaged, you can exchange the chip, and then execute the [Auto Home] action to confirm whether it is faulty and needs to be replaced.
● The nozzle temperature is insufficient. If the temperature of the print head is too low, the discharge will not be smooth. You can observe whether the temperature is excessively oscillating through the LCD screen or Pronterface. If the display temperature is lower than the target temperature by more than 20 degrees, the discharge will not be smooth. Please readjust the PID value. Oscillate at the target temperature).
● The nozzle is blocked. Foreign particles, metal chips, or hardened materials may cause nozzle blockage. It is recommended to use a 0.3mm drill to clean the nozzle when the nozzle is heated.
● The Teflon tube is damaged. First remove the Teflon tube on the quick connector. When the nozzle is heated, see if the material can be pushed in smoothly. If the material cannot be pushed in smoothly when the material is cut out of sharp corners, it means the nozzle The Teflon tube has been bent, deformed or damaged. Please replace it.
The printed product is bubble-like (rough surface)
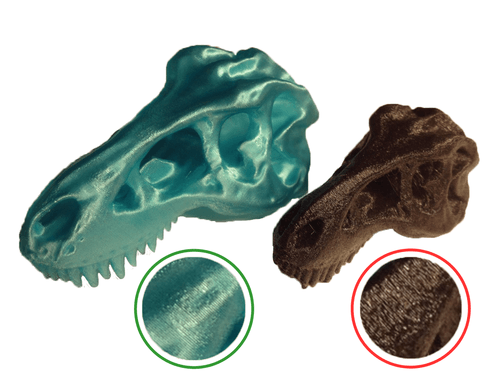
Good printed product, bad printed product
The nozzle temperature is set too high
If the nozzle temperature is set too high, PLA will produce gas, which will cause the printed product to appear bubble-like and look rough. Opaque materials will appear cloudy and rough, and transparent materials will appear more cloudy and rough. It is recommended to lower the temperature for printing.
Wavy lines or small print offsets appear on the print

The phenomenon of wavy lines or unevenness between layers in printing is usually caused by the parts of the print head platform that are not assembled correctly and tightly. Please refer to the overall structure to check the assembly conditions of the print heads to solve this problem.
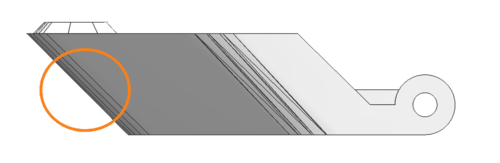
Faults and displacements in the printed appearance

Printed product with displacement
The condition of displacement is usually caused by the "out of step" of the transmission system. It may be a single axial out-of-step or multiple simultaneous. There are many reasons for out-of-step. Please follow the steps below to check the mechanism and motor of each axis:
● Is the synchronization wheel installed correctly? Please refer to the assembly instructions.
● Are there any foreign objects near the synchronization wheel affecting his rotation?
● Are all screws securely tightened and no shaking occurs?
Is the shaft of the stepping motor straight?
● Is the belt tightness appropriate? Please refer to the assembly instructions.
● Is the motor driver DRV8825 adjusted to the correct voltage? Please refer to the measurement and adjustment of DRV8825 chip voltage
The print is deformed on an inclined surface

Generally speaking, this kind of deformation is caused by overheating of the local temperature accumulation of the printed parts. We generally call it heat accumulation, which easily occurs when the nozzle stays in the same area for too long or the heat dissipation is not enough.
Most of it happens when the angle is steep and unsupported. The following are some ways to avoid heat accumulation:
● Make sure that the side blowing fans on both sides of the nozzle are set at the highest speed.
● Use a general electric fan to cool the easily deformed printing surface.
● Set [Min Layer] to slow down the printing speed and cool down the local area.
● Use [Prime Pillar] to remove the print head to allow time for the printed parts to cool down.
There are gaps in the back cover of the model

Condition 1-The nozzle group is loose
When the print head or the upper cover of the mobile platform is not properly locked, the print head is easy to shake and directly affects the printing accuracy. Please refer to (Overall Structure Inspection) to ensure the stability of the nozzle group. In addition, please make sure that the overall structure of the printer is stable. Any loose parts need to be inspected again and again. For example: the 6 corners of the machine, the joints of the aluminum extrusion structure, the slide rail, the slide table, the pulley, the ball head and the magnetic connecting rod, etc.
Condition 2-The temperature is too low or unstable
When the nozzle temperature is too low, it will directly affect the smoothness of the discharge, causing gaps in some corners. If this happens, you can try to slightly increase the temperature by about 5 degrees, and then continue to observe whether there is improvement. But when bubbles appear in the discharge, the temperature is too high, please lower the temperature. When the temperature fluctuates up and down, please make sure that the upper and lower windshields of the nozzle are properly installed, and re-adjust the PID value (the nozzle will oscillate at the target temperature when it heats up).
Situation 3-KISSlicer settings
Check whether [Loop / Solid Infill Overlap] is set to the highest value of 1.00. If the problem is still not solved, you can slightly reduce the extrusion line width, such as [Extrusion Width 0.35] and increase the amount of extrusion, such as [Flow Tweak 1.15]. Closer.
Silk-drawing phenomenon occurs in printing
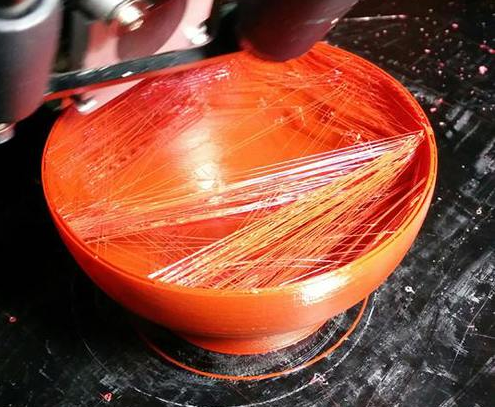
Generally speaking, this kind of deformation is caused by overheating of the local temperature accumulation of the printed parts. We generally call it heat accumulation, which easily occurs when the nozzle stays in the same area for too long or the heat dissipation is not enough.
Most of it happens when the angle is steep and unsupported. The following are some ways to avoid heat accumulation:
● Make sure that the side blowing fans on both sides of the nozzle are set at the highest speed. To
● Use a general electric fan to cool the easily deformed printing surface. To
● Set [Min Layer] to slow down the printing speed and cool down the local area. To
● Use [Prime Pillar] to remove the print head to allow time for the printed parts to cool down. To
Small model and detailed printing
The following files can download the Atom print test file, select the Eiffel_Tower_mini.STL file for setting exercises. This file is a reduced model of the Eiffel Tower (4.5cm in height, 2cm in length and width). It can be used to practice how to slice smaller and more detailed models.

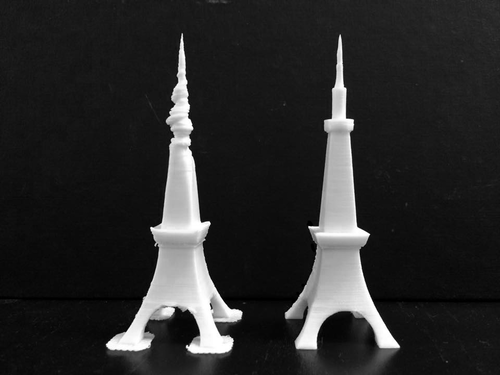
Figure 1: Printing example, printing failed (left) vs successfully printing (right)
When printing small objects with many details, the following factors need to be considered:
1. Wind to assist model cooling
When printing a layer with a small area, the heat of the print head is easy to accumulate on the model, which may cause warping. To solve this problem, you can activate the side blowing fan to provide additional auxiliary cooling function during printing (Fan / Cool ).
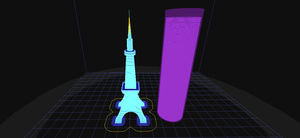
2. The printing time of the nozzle on each layer
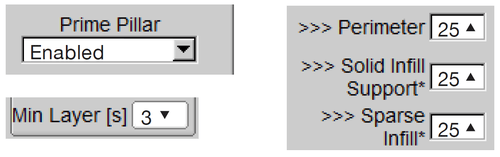
Set the side blowing fan function to lower the temperature of each layer during printing, and also activate [Prime Pillar]. When printing, in addition to printing the iron tower, a column of the same height as the iron tower will be generated beside the iron tower. Allow time for the nozzle to move away from the tower, provide enough time for the tower to cool and harden, and make sure that the setting of [Min Layer] is not too high, otherwise the printing time of each layer will be too long and cause heat accumulation. Set it for 3 seconds or Less, which can also reduce the time required for printing.
Set a reasonable printing speed to prevent the PLA from cooling down. The printing speeds are as follows:
Loops: 25 [mm/s]
Solid: 25 [mm/s]
Sparse: 25 [mm/s]
3. Will the wiping function cause more heat accumulation? To
When printing small objects or small details, turning on the [Wipe] function may cause the printing to warp, so turn off the [Wipe] function when printing small objects. If the model is large and has many details, it is recommended to set [Min Jump ] Set a higher value.
For Kisslicer, you can directly turn on Prime Pillar to increase the cooling time.
For Cura, directly increase the number of printed models to increase the heat dissipation time. To
Can't solve the problem?