

Atom 3D printer problem
HOME> Support Services> Technical Support> Atom 3D Printer
Power-on test-heating test
We can use the Pronterface software to issue commands to the Atom 3D printer:
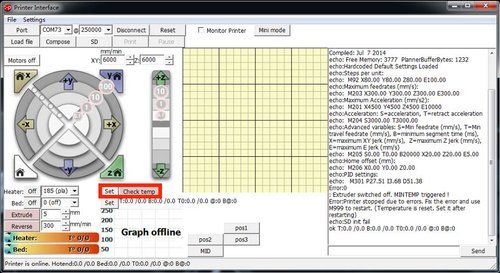
1. Make sure the printer is turned on and connected to the computer. To
2. Select [185 (PLA)] in the [Heater] part of the screen or input 185 directly. To
3. Click the [Set] button. To
4. Click the [Check temp] button to display the temperature curve of the print head temperature.
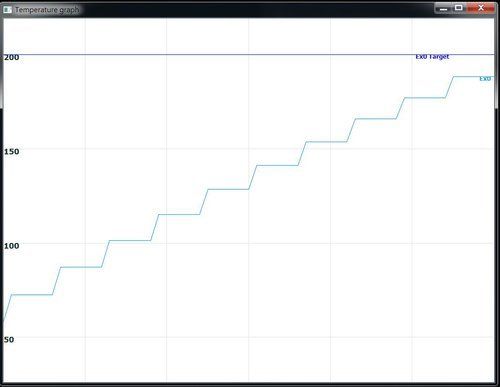
5. If everything is operating normally, the temperature profile should rise and reach 185 degrees. To
6. If the temperature does reach 185 degrees, click the [off] button to stop heating.
When heating or printing, the temperature of the print head is extremely high. Avoid contact with the print head, which may cause burns. Even if you have clicked [off], you should confirm that the nozzle has completely cooled down before you can touch.
The nozzle oscillates at the target temperature when it heats up
Before the nozzle heats up to the target temperature, the temperature will oscillate between ±10°C. This is a normal phenomenon, because when it enters the first ten degrees of the target temperature, it will enter the PID control mode. At this time, the temperature of the nozzle will depend on this. The system makes fine adjustments to reach the target temperature, and it also relies on this system to control the temperature during printing.
What is PID: In practical engineering applications, we often use "proportional-integral-derivative control" for regular control of regulators, referred to as PID (proportional-integral-derivative) control.
If the temperature fluctuation exceeds ±10°C or the nozzle has not reached the target temperature after heating for more than 2 minutes, first confirm whether the nozzle's windshield is installed correctly. If it is confirmed that the above situation is normal and there is a phenomenon of oscillation exceeding ±10°C, it is recommended to calibrate the PID value. The process is as follows:

1. Use the USB cable to connect Atom to the computer and turn on the power.
2. Open the Pronterface software and click connect to connect to the 3D printer.
3. Command [M303 C8 S200] (C=Cycles and S=target temperature) in the column on the lower right corner, after sending the command, wait for the program to run and then return the [kp] [ki] [kd] value. The more oscillation (C) is set, the more accurate the calculated value will be.
4. Operate the LCD screen: [Control]> [Temperature] and adjust the value of [PID-P] [PID-I] [PID-D] corresponding to [kp] [ki] [kd].
5. Operate the LCD screen: [Control]> [Store Memory] function to save the settings. To
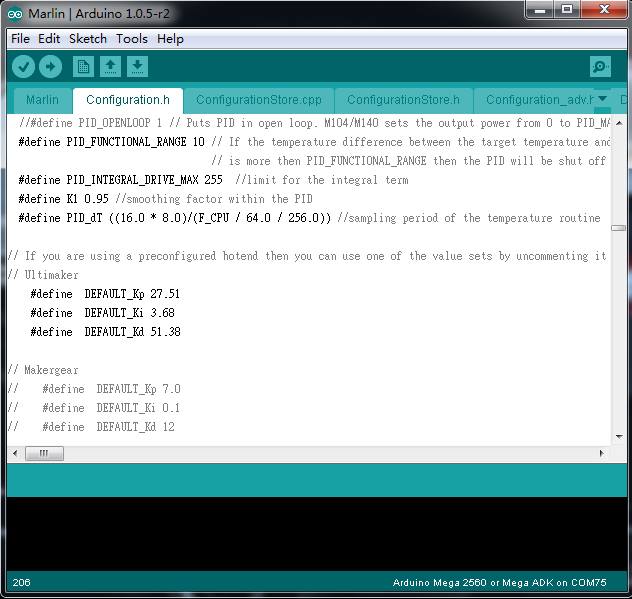
If you follow steps 1-5 above, Atom will have a new PID value setting. In addition, you can also update the PID value by updating the firmware. The steps are as follows:
1. After opening Arduino, open Configuration.h in Marlin.
2. Search for [DEFAULT_Kp].
3. Use the PID value measured by Pronterface to update the value of [DEFAULT_Kp] [DEFAULT_Ki][DEFAULT_Kd]. 4. Save the value of Configuration.h and upload the firmware to the Atom circuit board again.
Nozzle heating temperature problem
Condition 1-The temperature does not increase during heating
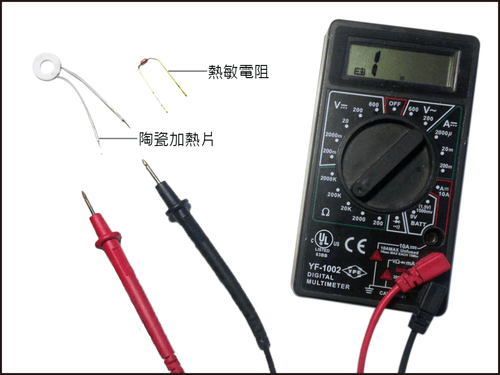
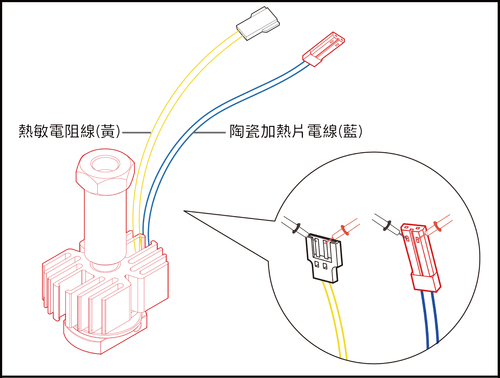
It may be part of the ceramic heating element is damaged. Please use a three-meter to check the resistance of the ceramic heater. Put the terminals of the meter on both ends of the ceramic chip wire. If the measured value is not measured, the ceramic heater is damaged. If there is no damage, please check with a three-meter. If the blue wire terminal connected to the ceramic heater cannot be measured, it means that the wire part needs to be replaced. To
Condition 2-The temperature is displayed as 0°C
First check whether the yellow line is properly connected, and then use a three-meter meter to measure the resistance at both ends of the thermistor. The value should be about 100K. If it fails to measure, it means damage.
Case 3-The temperature display exceeds 500°C
The circuit is short-circuited, please check whether the entire line of the thermistor is short-circuited.
Smoke or odor from the nozzle

When the nozzle is used for the first time, there will be some peculiar smell when heating, but there should be no peculiar smell afterwards. Therefore, when the nozzle emits smoke or produces a peculiar smell, it means that the temperature is too high. Usually we can know the temperature from the LCD screen, but it is possible that the thermistor is abnormal and different temperatures can be measured.
Condition 1-The thermistor is broken and the temperature cannot be measured. The thermistor needs to be replaced.
Condition 2-Thermistor leakage causes abnormal temperature measurement
If the thermistor of the print head is not in the correct position (Figure 2), it may cause abnormal temperature measurement, resulting in overheating. At this time, after cooling the nozzle first, push the thermistor into the nozzle again. Make sure that the thermistor is in the center of the nozzle as much as possible (Figure 1), and make sure that the leaking wires are covered by Teflon Do not move the thermistor because of moving the thermistor. If the leaked thermistor wire touches the nozzle, it may cause the entire circuit to be shorted and damaged.
*note! Do not touch the heated nozzle without any protective measures!
Can't solve the problem?