

Slicing technical support
HOME> Support Service> Technical Support> Slicing Software
Download and support
You can download the Cura configuration file in our download area, and click me to watch the configuration file input tutorial.
About Cura
Cura is one of our recommended slicing software. A slice is a 3D STL model that can be converted into a .gcode file that can be read by a 3D printer. Cura is a free and easy-to-use software, but you can still adjust the printing parameters according to your needs.
Print for the first time with default settings
In this process you need:
● Cura
● Test print files downloaded from support
● SD card (format: FAT32)
● A Windows or Mac computer that can run Cura and read SD cards
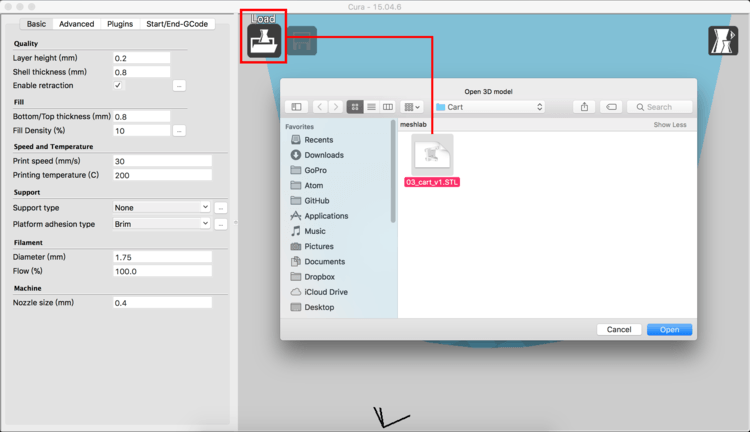
1. Run Cura.exe, click [Load] in the upper left corner of the software screen, browse the downloaded file and select the cart.stl file, or you can drop cart.stl into the Cura screen and open it directly.
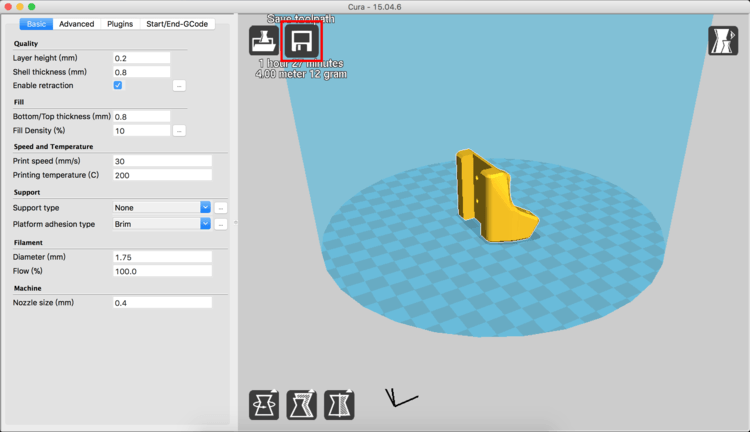
2. Cura starts to slice, you can insert the SD card into the computer for use. Once dropped in, it will be sliced automatically. When finished, the [Save] button will light up. At this time, you can save the .gcode file in the SD Card (the SD card can be read in the root directory or folder in the machine). file).
3. Insert the SD card on the side of the LCD screen of the Atom printer, and select [Print from SD Card] on the control knob.
4. Select the file [cart.gcode] and press the knob to start printing.
At the beginning of printing, the printer will start the [Auto Home] action, then it will drop to a certain height, and then begin to heat the print head, once it reaches a predetermined temperature, it will start printing.
Check the layer height of the first layer printed out and compare the printed results. The printing quality of the first layer is related to the overall printing quality. If the quality of the first layer is not good, it is recommended to re- Print, and may need to re-adjust the height of [Z-offset], you can refer to (Automatic calibration setting teaching) after adjustment, re-select the file to print.
Cura interface introduction

1. Quality setting
1. Layer Height: layer height
The layer height, that is, the resolution, is usually set to 0.2 mm. The thicker the printing, the faster the printing, and the relative surface fineness will also be affected. If you want to down-repair, 0.1 ~ 0.15 mm already has a pretty good fineness, and 0.05 mm is fine. Print the model with the finest surface, but it will take longer to print.
2. Shell Thickness: Shell Thickness
In this part, we usually set the multiple of [Nozzle Size]. To
3. Enable retraction: enable retraction
Dragging is usually caused when the print head jumps from one point to another when printing, just like a thin spider web. It can usually be eliminated by using a lighter to overheat it, but this work usually feels tedious and troublesome. If it can be printed at the beginning It would be better to produce a complete printed product. Therefore, it is recommended to turn on the retraction function when printing to reduce the phenomenon of thread pulling due to residual material when the nozzle is moving.
Two, fill
1. Bottom / Top Thickness: Bottom / Top Thickness
2. Fill Density(%): Fill density
Set the density of the internal structure. When printing, you can choose to print the complete entity (100%) or use the internal filling setting to save printing time and reduce the consumption of PLA materials. The percentage adjustment can be adjusted depending on the item The size varies, general items up to 16.7% have enough strength.
3. Speed and temperature
1. Print Speed: print speed
2. Print Temp: print temperature
3. Bed Temp: hot bed temperature
Four, support
1. Support Type: Support mode
Touching buildplate: The support will only connect the suspended part that can be connected to the printing platform
everywhere: Not only connect the suspended parts that can be connected to the printing platform, but also long supports on the outside or inside of the object.
2. Platform: the first layer mode
None: Only use the Skrit method. This function is to walk an outer ring around before printing the first layer and continue to push the material out. It is a pre-discharge mechanism to ensure that the material can be connected when the body is officially printed. On. Usually, this function must be selected for each print, which can help to output the material smoothly at the beginning of printing.
Brim: A layer of bottom plate grows around the model and a few laps out. This function is usually used to print a model with a small bottom plate area. The auxiliary model can smoothly print the first layer on the glass plate because it grows around the model. , So it is easier to disassemble than Raft after printing. It is better to set [Brim] about 15 to 20 laps outward.
Raft: A bottom plate is grown under the model and the support material. This function is usually used to fix the support material or a model with a small floor area to help it smoothly fix the bottom on the glass plate (but it is difficult to remove it later). If it is a spherical model We can also open the support to make the first layer take shape smoothly.
3. Support dual: extruder selection
You can select the extruder to be used for the support material. For example, if the support material is placed at the position of E1, select Second extruder.
Five, dual extrusion
Wipe&prime tower: refueling tower
To avoid mixing the two materials, if you need to print two materials or two colors, you need to turn it on.
Six, wire
Flow: Flow
Adjust the extrusion flow rate of the nozzle. Usually we will set it to 1 which is 100%. If the material used is not standard (1.75mm), this value may need to be adjusted. If the material is too fine or the output is insufficient, an increase of 5% may be required Therefore, enter 1.05, which can be adjusted as required. But you need to pay attention to whether the nozzle is blocked due to this adjustment.
Seven, the machine
Nozzle size: Nozzle width
Cura advanced settings
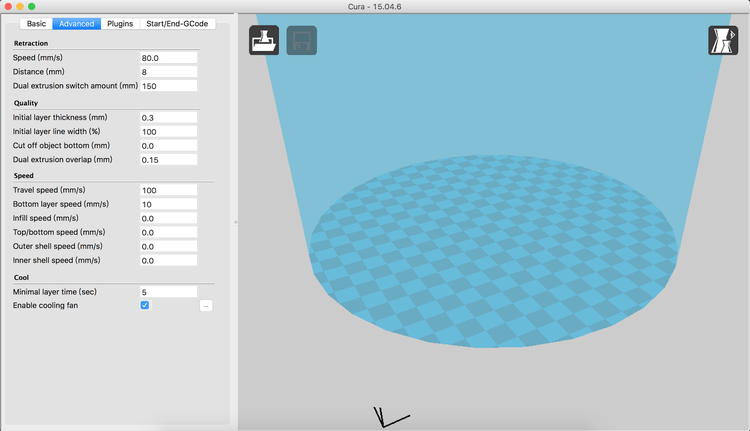
Retraction
Speed: Retraction speed
Set the speed of retraction and retraction, usually printing PLA or ABS is set at 80 ~ 120mm/s. Note that this value must not be set too large. If the retraction and retraction speed is too fast, it may affect The nozzle stability may pull the nozzle platform. If you are printing soft materials or more flexible materials, you need to set the retraction value lower.
Distance: Retraction distance
Pull back the wire and push it back into the nozzle again. The default value is set to 8mm. To
Dual: Double material reloading distance
In order to prevent the wire from being interfered by the Y deflector, the distance that needs to be returned when changing the material, the default value is set to 150MM. To

Dual Extrusion
Wipe & prime tower (mm3): refueling tower volume
The larger the volume, the cleaner it will be. Pay attention to whether it exceeds the printing range.
Retraction
Z-hop: The Z axis is raised when retracting
After the retraction (Retraction) is completed, when the print head is about to move, it will first lift a certain distance. If the object is a closed structure, it can avoid the print head from interfering with the printed part. But if it is a more open structure (for example, there are many holes), you can set this value to 0 to avoid wire pulling.
Skirt
Line count: the number of side skirts
It is recommended to adjust at least one turn.
Brim
Brim Line Amount: Number of laps
It is recommended to input at least 15 circles, 15 times the nozzle aperture 0.4, the width of Brim is 6mm.
Can't solve the problem?