

Laser Software
HOME> Support Services> ATOM 2 Series> Getting Started> Using Laser Software
Install Software
Please download the laser engraving software "Burner" in the download area first.
Connection and Calibration
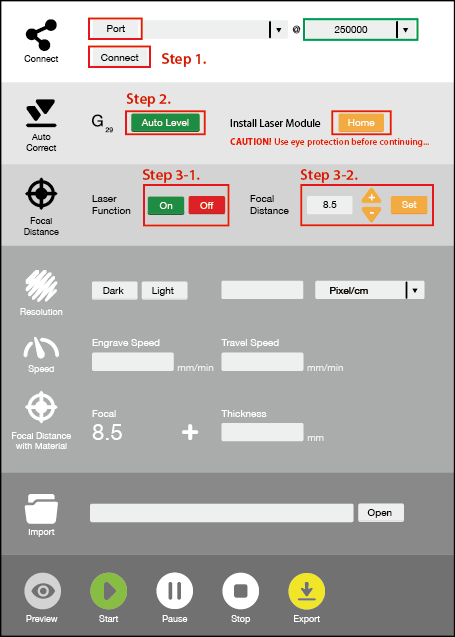
Step 1.
After connecting to the computer using USB, click [Port ], and the serial port will appear in the drop-down menu after the connection is successful. After selecting 250000 in the green box, click [Connect] to connect. If the connection is successful, a check mark and [Disconnect] will appear. If [Port] can't be searched, please see the note below.
Step 2.
First use the original print head for automatic calibration, click [Auto Level] and then replace the laser module, and then click [Home] to return to the origin.
note! If you need to turn on the laser light source in the subsequent actions, be sure to wear goggles first to avoid injury.
※ Note: If the computer cannot be found in [Port], please go to Virtual COM Port Drivers to download the software. There are installation downloads for various corresponding models.
Download URL: http://www.ftdichip.com/Drivers/VCP.htm
Installation instructions: http://www.ftdichip.com/Support/Documents/InstallGuides.htm
Step 3-1.
note! Please wear goggles first.
The laser is turned on [on], turned off to [off], the default value of Focal Distance (focus setting) is 8.5, and the amplitude modulation is 0.1. However, each group of lasers is slightly different. It is recommended to use the previous setting to follow the next step. Adjust the focus.
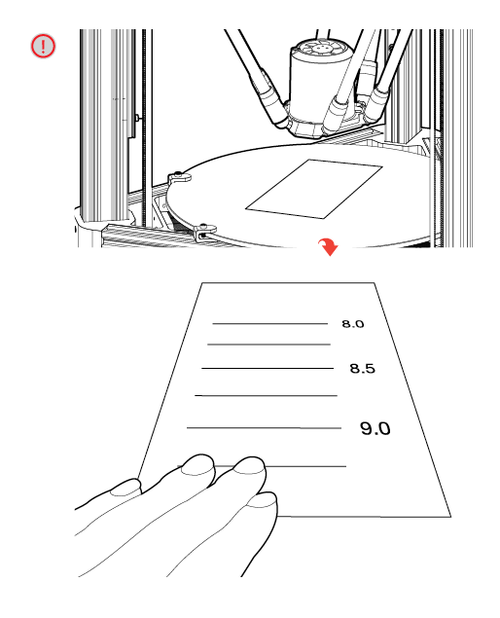
Step 3-2.
※Please do not use white paper! Because the reflectivity of white paper is too high, it will not be able to focus.
It is recommended to click here to download the test file for testing, or use a piece of paper to test the focal length. You can adjust the value of the focal length up and down. If the focal length is at the correct focal length, the paper will have burn marks. Move the paper a little to see if the engraving is smooth, and test the height of the movement.
Value setting

[Light] Select the resolution
Engraver Sp 200 mm/s
Travel Sp 3000 mm/s
[Dark] Select the resolution
Engraver Sp 400 mm/s
Travel Sp 3000 mm/s
[Engraver Speed] The default is 200
Expressed as laser engraving speed, the faster the speed, the shallower, and vice versa, the deeper. To
[Pixel/cm, Pixel/inch] It is recommended to preset to 200
The resolution of the original image file can be input to achieve accurate refinement. To
[Travel Speed] The default is 3000
Expressed as the movement speed without laser engraving. To
[ Focal ]
The focal length is the value measured in the previous step.
[ Thickness ]
The thickness of the material is recommended to be input after measuring the thickness of the material to be cut with a vernier caliper. To
[ Import ]
The input .png file must be confirmed as the png format with white background and black image (not transparent background), and a preview image will appear on the left after input. To
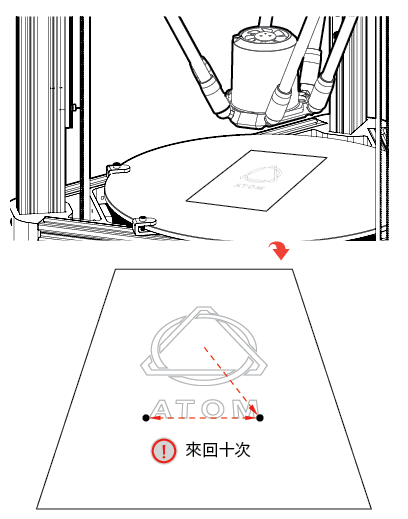
Preview and start carving
[Preview] Preview the position of the bottom line of the picture
The laser module will run back and forth about 10 times, and you can put paper on it for alignment during operation. After the alignment is complete, press [Start] to start laser engraving. To
[Start] Start laser engraving
[Pause] Pause or restart
[Stop] Stop
[Export] output (file type is .gcode)
If you miss the preview run, press Preview again to restart the run. You can also use the SD card to print after [Export] the .gcode file.
Can't solve the problem?